Single Products
Single Products
The Single Products section serves as a centralized product repository, storing products independently from channel-specific listings. To maintain product consistency across channels, you can set up channel mapping. For more information, refer to the Channel Mapping section.
There are three methods for creating new products in item PIM: by importing from third-party channels, via CSV file import, or manually:
Bulk Import: You can download the CSV template, fill it out with the product data, and then re-upload the CSV file.
Import from Channel: Connect your channels to import product data and save products as master products in the system.
Single Add: Manually enter product info for each product.
Import Products

Bulk import products
To bulk import products:
1. Sign in to item PIM with your account. 2. Navigate to Products > Single Products. 3. Click + Add New on the top-right corner to open the Add Single Item pop-up window. 4. Select Bulk Import and download the template provided. 5. Fill out the template with the necessary product information. 6. Upload the completed template by clicking Upload.
Import products from channels
To import products from channels:
1. Navigate to Products > Single Products. 2. Click + Add New on the top-right corner to open the Add Single Item pop-up window. 3. Select Import from Channel.
If you have connected sales channels, all channels will be listed. Choose the products from each channel respectively.
If you have no channel connected, click Connect Your Channel and choose a sales channel to connect from the channel list. Once connected, the list of sales channels will be displayed. Select the products you want to import.
4. Click the Import from Channel button to complete the process.
Manually Create Products
To manually create products:
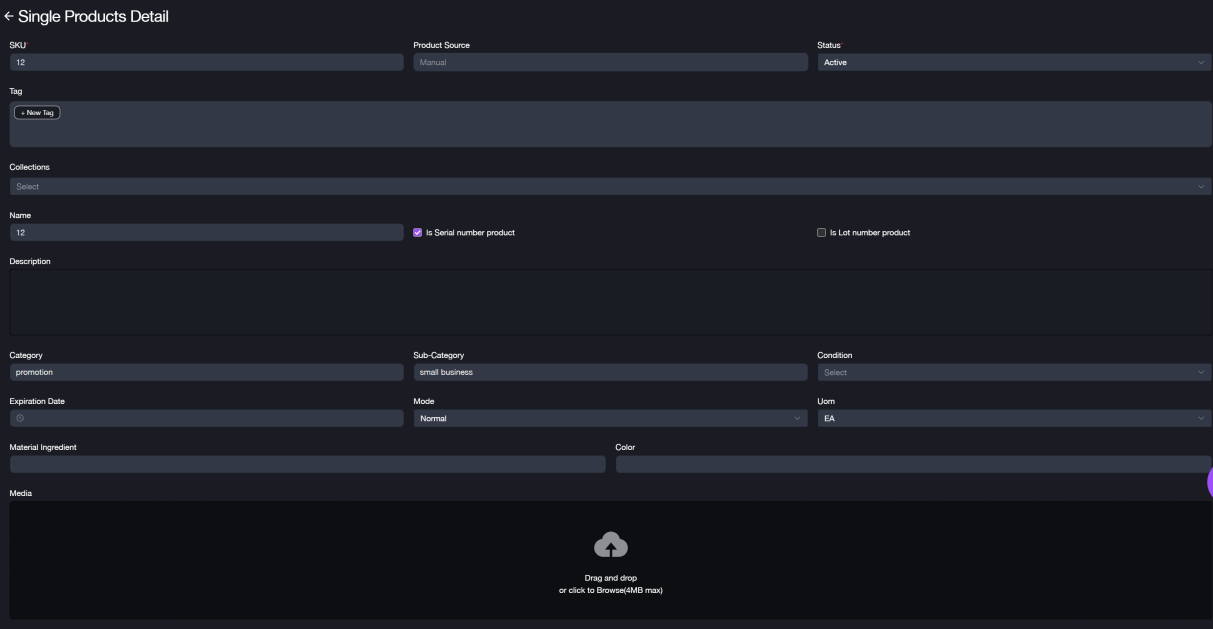
1. Navigate to Products > Single Products. 2. Click + Add New on the top-right corner to open the Add Single Item pop-up window. 3. Select Single Item and complete the Product form. 4. Enter the product SKU and set the product status based on its condition. The product status is set to Active by default, and the Product Source field will automatically be set to Manual. 5. Select Customs Shopping Packages and input the package dimensions (Length, Width, Height) and choose the unit. 6. Enter the product weight and choose the unit.
Note: After customizing the package info, you can save it as a template by clicking Save Package Template. Enter a template name in the pop-up window, and click Save. This template can be reused when creating new products in the future.
7. Enter any additional information for the product referring to the Product Form Fields, and you can create product variants under this main product:
Product Form Fields
Create Product Variants
8. Once all product details are entered, click Add Item to save the new product info.
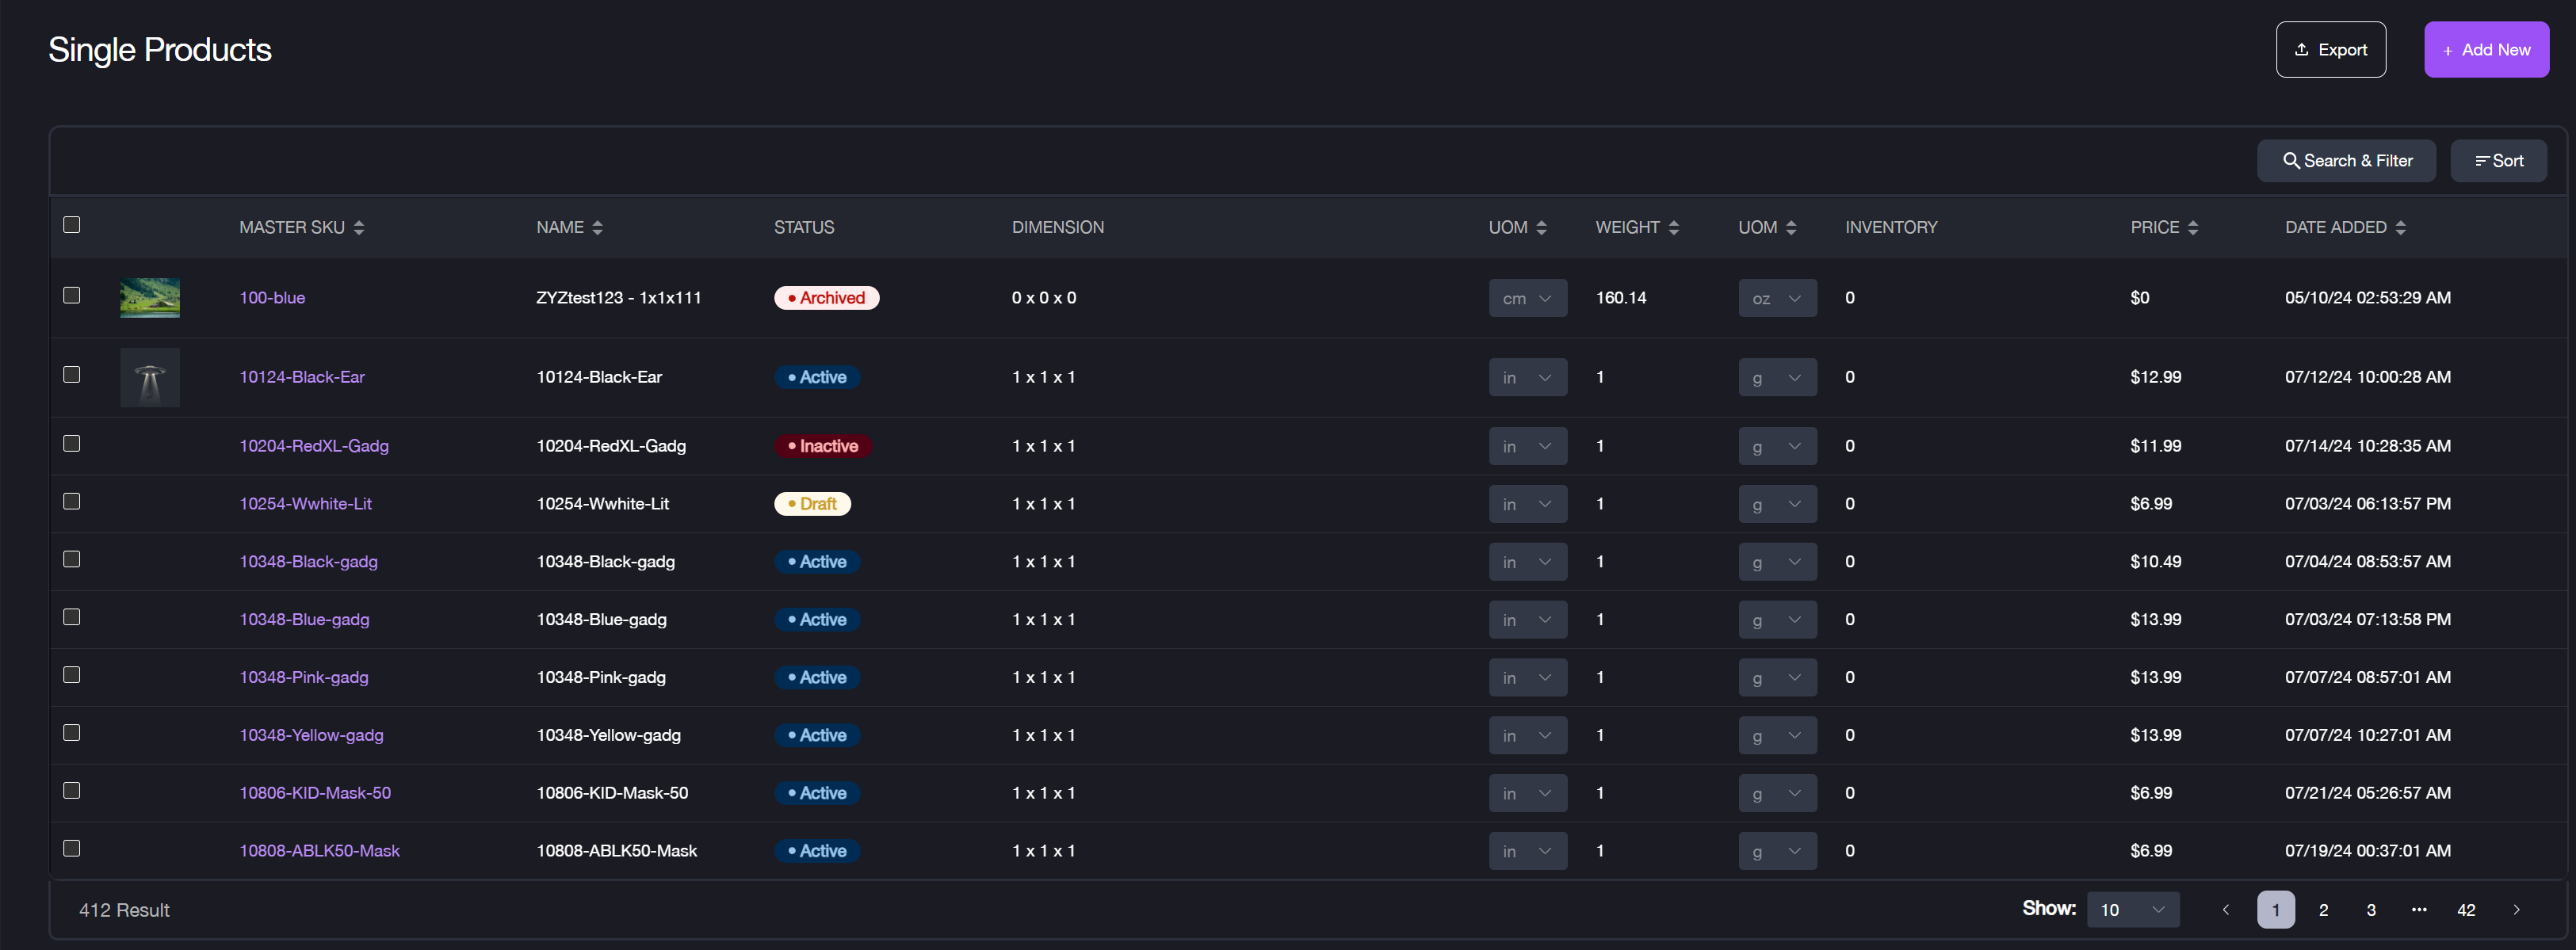
All products that you manually create or import will be displayed in the Single Products list. By default, they are represented by their Master SKU in item PIM and sorted alphabetically.
Product Form Fields
When manually creating a product, it's essential to fill out the required fields (Part A) of the product form. Optional fields (Part B) can be completed based on the product's details to ensure comprehensive product information.
Part A: Required fields
Field Name | Description |
|---|---|
Product Info | / |
SKU | The unique identifier for the product. |
Status | Choose from four options: Active, Draft, Archived, and Inactive. |
Product Packages | / |
Dimensions | The package dimensions (Length\Width\Height) used for shipping. |
Metric | Select the unit for dimensions (cm or in). |
Weight | The weight of the product. |
Metric | Select the unit for weight (kg, lbs, oz, or g). |
Part B: Optional fields
Field Name | Description |
|---|---|
Additional Info | / |
Tag | Add relevant tags to categorize the product. |
Collection | Assign the product to a pre-configured collection (Configured in Products > Collection). |
Name | The product name. If left blank, it will auto-fill with the SKU. |
Serial/Lot Number | Indicate if the product requires tracking by serial or lot number. |
Description | Provide a brief description of the product. |
Category | Specify the main category of the product. |
Sub-category | Specify the sub-category. |
Condition | Choose the condition of the product (New, Used-Like New, Used-Good, or Used-Fair). Default is New. |
Expiration Date | Specify the expiration date, if applicable. |
Mode | Select the product mode (Normal, Trans-load, RMS, Material, or Sample). Default is Normal. |
UOM | Choose the unit of measure (EA, CA, or PL). |
Material Ingredient | List the material ingredients. |
Color | Indicate the product color. |
Media | Upload product images by dragging, dropping, or clicking to upload. |
Pricing | Enter the product price. |
Inventory | Inventory details should be configured separately in Inventory > Inventory Adjustment. |
Barcode | Enter the product barcode. (ISBN, UPC, GTIN, etc.) |
Pricing Discounts | If applicable, add discounts by specifying the quantity and discount price. |
Product Variants | / |
Variant | Define options like color or material for product variants. |
Group | Products displayed vary from variants group. |
Shipment Service | / |
Carrier | Select the preferred carrier (UPS, DHL, FedEx, etc.). |
Delivery service | Choose the delivery speed. (1 day, 3 days, overnight, etc.) |
Create Product Variants
The Variant feature allows you to create different versions of a product under the single parent product. These variants share the core attributes of the parent product but differ in specific characteristics such as size, color, material, or other customizable options.
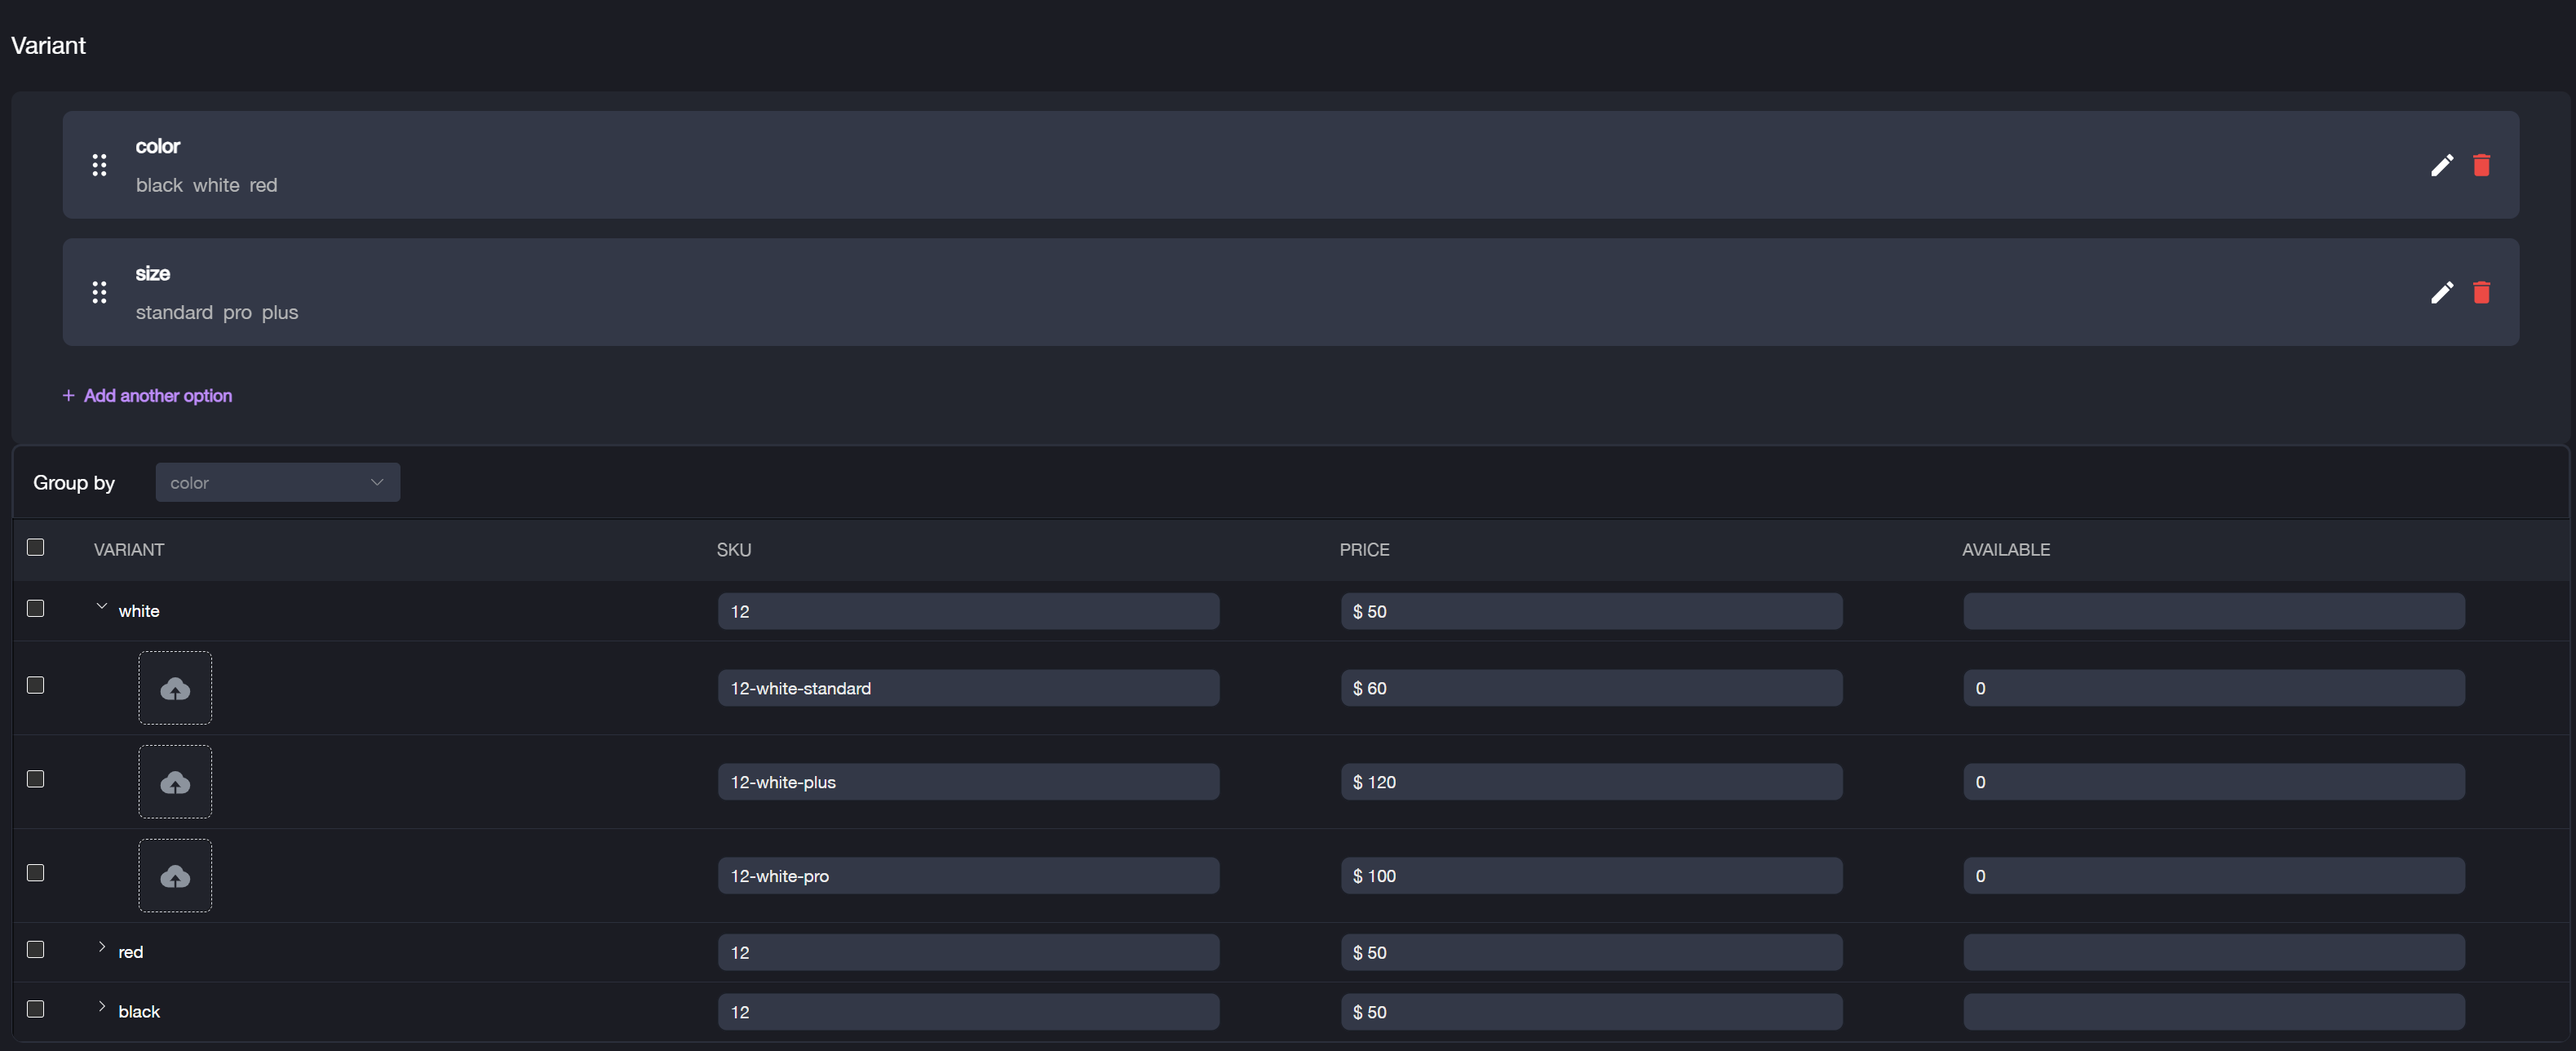
To Create variants under a Single Product:
1. Navigate to Products > Single Products. 2. Select an existing product from the list to edit and add variants, or you can add variants when creating a new product. 3. In the Single Product Detail form, locate the Variant section. 4. Click + Add another option. 5. Enter the Option Name (e.g., Color, Size) and Option Value (e.g., black, white, red; standard, pro, plus). You can add up to three options, with no limit on the number of values per option. 6. Edit the Variant SKU and Price for each child product. \ By default, the variants under this product will inherit the SKU of the main parent product. 7. Choose how you want to group the variants by selecting the Group by type. 8. Click Confirm** to save product variants.
For example: If you add options like Color (black, white, red) and Size (standard, pro, plus), and choose Group by color, the system will generate child products for every possible combination based on color.
Editing Variants
To edit the variant:
1. Select the product from the Single Products list. 2. Click the Edit button located in the bottom-right corner. 3. Locate the Variant section and click the pencil icon to edit either the Option Name or Option Value. 4. Click the Done button to save changes.